Tuesday 24 December 2013

DIY gift tags

Pin It!

My absolutely worst habit is doing everthing last minute, so here I am making gift tags on Chrstmas Eve. Since I need them quick but still pretty, I chose the simplest approach for which you will only a few things, most of whch you can find at home anyway.

DIY gift tags with lace
You will need:

  1. Lace (if you don't have any, you can substitute it with any decorative string).
  2. Thin cardboard ot thin paper for the tags (these I actually bought, but only later I realised I could have made them myself just as well)
  3. Some string for the tags
  4. Glue
Easy DIY gift tag with laceIf you did not buy the basic tas like I did, find a shape for them on the internet, print it and cut out as many as you need ftom thin cardboard or just quite thick paper, put the strings on. Cut the lace in such length thet it would be enough to go around the tag. Take the glue (any glue will do, but hot glue will dry faster), glue the lace around the tag in any place you want, I did it on the bottom, because I still ned space to write. Quick and easy :) you are now done, wait till they dry and you are ready to decorate your gifts with those.


Wednesday 18 December 2013

DIY macaroni (pasta) angels

Pin It!
I make pasta angels every year, and use it for packaging Christmas gifts or as a Christmas souvenir or just to decorate my home. They are pretty simple to make and very cute.

You will need:

1.       Farfalle for the wings

2.       Penne, rigatoni or similar for the body

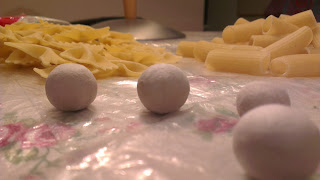
3.       Modeling clay for the heads

4.       Gold or silver spray paint

5.       String for the loop

6.       Glue


Step 1. Take the clay and make little balls from it, adjust the size of the heads according to the macaroni size you are using for the bodies. It should look proportional. Set aside the heads to dry a little bit. If youe clay is dry or old just put it in a bowl of warm water and leave it there for a while, than take it out, wipe the excess water and it'll be as good as new.

Pasta angels DIY


Step 2. Glue the wings to the bodies. Depending on what glue you are using, you might need to hold the wing in place for a few seconds and then put it down. I used my hot glue gun, but several fell of, last year I used Superglue, it was much better.

Pasta angels DIY

Step 3. Glue the string to the top of the body, near the back of the head (where the head will be). Set aside to dry.

Step 4. Glue the heads to the bodies. From my experience, it’s better to glue the heads while they are still a little bit wet, because you can the shape them according to the shape of macaroni body.
 
                              Pasta angels DIY Pasta angels DIY

Step 5. Spray it with paint. I did half of mine with silver paint, the other hald with golden, but I must say, I like the golden ones more :)
 
Silver and gold pasta angels

You are done :)

Tuesday 17 December 2013

How to decorate your home for the holidays

Pin It!

So I found myself looking for ways to decorate our home for the holidays cause somehow I am lacking the Christmas spirit this year. My boyfriend likes very simple decorations, the traditional Christmas tree with red, blue or white baubles - done. And for a few years I went with that, but this year I want something a little different, something warm and cozy, so I was looking for what I could use or make and these are some nice ideas that I found.

1. Candles, candles, candles
For me candles are the ultimate makes of coziness and warmth, especially when it‘s dark and cold outside. Use regular or scented candles and simply put them in the middle of a wreath or decorate them with pine cones, evergreen or mistletoe. I also love the idea of putting candles in mason jars, you can make a lot with that.

 Decorate candles for Christmas with kishus and nutsDecorate candles for Chrstmas with any conifer like evergeern or a mistletoe


2. Wreaths 
Wreaths are great just because they can come in all kinds of different sizes and shapes and you can make them from almost anything. I have a wreath which I bought several years ago in a charity fair for disables kind and since it's made from cones and oak nuts and little red plastic apples, I think I will use it forever. I have never made a wreath myself, but if you are  little bit more DIY savvy than me, you can try some of these.


3. Pasta ornaments
I did quite a few of those this year. My favourite ate little pasta angels, the tutorial of which I will post in my next posts, but I also did several Christmas trees with my colleagues this year to decorate our office. It takes patience and strong glue :) but it's worth it, especially when those little angels are born :)


 Pasta angels Pasta Christmas tree

4. Lights in a jar or a lantern
Lights in a lantern
Whenever I see pics of this - it looks just magical, they are like jars full of fireflies. But I have tried this at home and well, with a jar you dace two problems - if your lights are the kind that you have to plug to a wall, there's no way you will close the jar and it won't be mobile, if your lights have batteries, the block you put the batteries in will be quite chunky and you will need a larger jar which your lights won't fill (like mine). Because of that, I think putting lights in a lantern and hanging in the porch (if you have one) would do the trick.

5. Nuts, tangerines and hot wine
I don't know how about you, but for me these three scream Christmas. Thus I always have them around at this time of the year (not so much the wine maybe). So try to think what's your ultimate Christmas snack or beverage, what says Christmas to you, maybe it's gingerbread cookies or maybe it's banana bread, a little eggnog? Try to make it avalable to you at all times (maybe go easy with the eggnog ;)) during the holidays and it will lift your spirits.

7. Advent calendar
I always have one, always always always. For me it's inseparable from the pre-Christmas time, because my Mom used to get one every year since I was a child. What's more, when I was little, we were still largely a very post-soviet country, so very little was available here, but my Mom used to travel with work a lot to Scandinavia and bring one every Christmas, it was something very special. So if you don't want to buy one with chocolates, you can make one at home and stuff it with anything you like. You can also check out my tutorial for a matchbox advent calendar here. Having one makes you and especially you kids wait for each day with eagerness to see what it brings.


My inspiration is from:
http://domo.plius.lt/interjeras/straipsniai/idejos-namams-sukurti-sventine-nuotaika?page_nr%20=1&utm_source=2013-12-16&utm_medium=email&utm_campaign=naujienlaiskis&utm_term=2013-12-17
http://www.accentondesign.net/blog/?Tag=Christmas%20decorating
http://www.interiororiginal.com/wonderful-christmas-candles-and-decoration-ideas.html/wonderful-christmas-candles-and-decoration-ideas
http://www.merledress.com/blog/12-unique-christmas-mason-jar-ideas.html
http://www.woohome.com/diy-2/top-35-astonishing-diy-christmas-wreaths-ideas
http://www.bhg.com/christmas/wreaths/pretty-christmas-wreaths/#page=2

Monday 16 December 2013

Handmade matchbox advent calendar

Pin It!

Matchbox advent calendarI know it's a little late for this as it's already mid-December, but I found these pics and were eager to share. I made this last year as a project for work. Yes, work, now you must be thinking – cool job if I get to do these kind of stuff. Well I work in a retail company, where I am responsible for catalogue-retailing and I did this for our Christmas catalogue of 2012. The challenge here is that I had to get it ready by October, because this is when we send out X-mas catalogue to print and by that time I could hardly find any Christmassy wrapping paper or any other stuff of that sort, but somehow I managed. So there it is.


You’ll need: 
  1. 24 match boxes
  2. 24 pins for the handles
  3. 2 pieces of thick cardboard (10cmx10cm) for the top and bottom
  4. 3 pieces of thinner cardboard (7cmx7cm)
  5. Wrapping paper (whatever you think is nice)
  6. Glue
  7. Embellishments for decoration
  8. Candy

This is how you do it:
  • Empty the match boxes, glue them together in stacks of three. Hold it firmly or let the glue dry, so it would really stick together.  Form two stories from the stacks of three boxes.
How to stack boxes for advent calendar
  • Flue each story to a thin piece of cardboard with one piece in the middle, so it would hold in place and the glue the two together.
  • Take the thick cardboard and decorate it with desired wrapping paper, then glue one to the bottom of the box, the other to the top.
  • You are almost done, now take the wrapping paper and decorate the sides of the matchboxes which are left visible, but that are not drawers.
  • Write numbers from 1 to 24 on the drawers, or use stickers as I did.
  • Put the beads in the drawers as if they were the handles.
  • Put candy in each drawer.

DIY matchbox advent calendar


You are done :) I think this is a great project to do with your kinds – it’s easy, it’s simple and it’s fun :)

Sunday 15 December 2013

My first glue gun or how it all starts

Pin It!
So today I bought my first glue gun and my boyfriend decided that it’s BIG for a girl and that I should document it. I am not a very crafty person, but from time to time I like to take up a DIY project, especially during the holidays. At school I was never the one who makes pretty things and handicraft lessons were torture. My knitting was always crooked and I won’t even start on my sewing… However it turns out that I am pretty good at following instructions or when I see something I like, I visualize pretty well how to make it. I was especially surprised last year by my gingerbreads in jars. I was sick with flu the whole December and I didn’t have any time to think of presents so I made gingerbreads for everyone, put them in pretty jars and tied red bows on every each of them (the bows were the hardest part…). 
Christmas gingerbread cookies

It was a big hit with my family, no one believed I have actually made them myself… My Mom actually thought I bought them, so that tells a lot about how I am with crafts J Anyhow, it looked great, so I started believing in myself a little bit more and making more stuff by myself. So if you are like me – not the best crafts-girl but like making pretty things, you will also like this blog.

Back to the glue gun.
Whenever I wanted to make something and find a tutorial to do it, the glue gun would pop up there. I never had one of my own; instead I used some strong glue. And what’s more, I come from a little country in Eastern Europe called Lithuania, where sometimes getting stuff can be difficult. Now I know what you’re thinking – Easter Europe, goodness gracious – Borat…. Well no, nothing like that, it’s just that when the market is so small, some stuff are either much more expensive or hard to find. But I saw these glue guns in the local store and I couldn’t resist. I got home and I even told my boyfriend to find out if I buy one, will I later be able to get additional glue sticks for it. After the research was made and I was good to go, I got one for 15,99LTL (~ 7 USD). So there it is. 
glue gun

It’s tiny, but I think it’ll be more than enough for what I have planned for this holiday season! Stay tuned for more J